Tuesday, 22 March 2016

Bloomsberry remover for yellow nails


I first came across the name of this product on you tube nailz4fun video https://www.youtube.com/watch?v=3VSRZubZz6Y. 

This product was meant to reduce the yellowish stains on nails caused by repeated usage of nail polish.
I also have yellow stains on my nails and thought I will give it a try after watching the above video.
I purchased this from amazon for Rs.149 no shipping charges.

This is actually a nail polish remover that is slightly different in its usage, you remove polish and then shake this bottle well, dab a piece of cotton and rub slowly on your nails to remove yellow stains.


After using it I found my nails looked more clean but dry, though the pack says it moisturizes, I felt my nails looked dry, there is only a mild reduction of the yellowness of your nails, I think I will continue to use to see if there is any remarkable change, but for now I did not notice any remarkable change in person. The fragrance is that of a usual nail polish remover but not too strong.


 If you like to buy here is the link
http://www.amazon.in/Bloomsberry-Revival-Remover-Discoloured-Fragrance/dp/B012AZ9NI2/ref=sr_1_6?m=A20BL0LQIQ9U1F&s=merchant-items&ie=UTF8&qid=1458642375&sr=1-6

Ali express stamping plates and born pretty stamper

Anyone who wish to practice nail art but are looking for affordable nail art items, fret not aliexpress is the place, you can even buy one item for 10rs with  free shipping :-). Most sellers on this site are ready to ship items individually,  no minimum purchase required to be eligible for free shipping. ain't this great.

Now on to my review on the stamping plates.

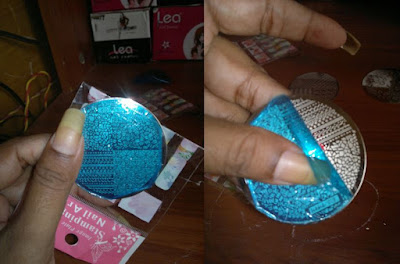
I ordered 3 stamping plates US$0.65 each somewhere between Rs.35- Rs.48 per plate you have a nice set of stamping plates to try your nail art. I ordered hehe plates #005,#019,#066, all of them stamp very well.  These plates are small and thin but perfect for stamping nails. The etching is really good that even small details print very well.

here are some pictures.
Remove the protective film before use.


hehe - 005 is an attractive plate with beautiful details


hehe - 019 is also another beautiful plate which I picked up especially for the mermaid pattern.


hehe -066 is a unique plate with bubbles, water, babies and a flying girl, I picked this plate for the bubble and ain't no disappointment it prints so well .


I used the born pretty stamper, it stamps like a dream, no prepping required. this one comes with two scrapers suitable for the different sized dual ends. I bought this for $2.68 approx Rs. 150 during new year sale


Now here is the much awaited swatch . I used the BM lotus mat to stamp over, see how well it has printed, now I cant wait to try a bubble mani :-). Here I used Cemera france nail polish in white for stamping


 links for products:
stamping plates: aliexpress   http://www.aliexpress.com/item/Hot-Sale-Premium-Nail-Art-Image-Stamp-Stamping-Plates-Manicure-Templates-DIY-Plate-hehe-Series/32401582742.html

Stamper: Born Pretty   http://www.bornprettystore.com/3pcsset-sell-double-sided-stamping-nail-stamper-scraper-p-12024.html


Monday, 7 March 2016

Newspaper nail art with alcohol prep pads (for all who have had newspaper stuck to your nails :-) )


                            No top coat                                                                        Top-Coat


 Have you heard of any saying that goes "A person who gets it right the first time, never learns anything", If no, you heard it from me now.

Yes, long before I did try newspaper nail art when I was still new to nail art. It was one of my very first attempts after trying some of the more easy nail arts by Sveta Sanders :-), Yes, I was that naive to nail art, I started attempting her very famous drag marble nail art when I was just a novice entering into the world of nailartism.

I had no clue about the difficulties or the expertise hard work and focus that goes into these mind blowing nail arts. I thought it should be as easy as applying nail polish, Oh yes, now I have also learnt how to apply your nail enamel professionally :-).

So here I thought I should do a newspaper nail art again, now that I have my blog and Facebook page. So I sat there attempting and re-attempting this beautiful Idea of a nail art, only to find the ink would transfer lightly, the image was not clear or worse when you think you transferred the image beautifully, only to find later that the newspaper image had stuck to your nails , now that is not a bad Idea either, just cut the newspaper and stick to your nails.

But, I was not going to do that. I had to try no matter what. after all so many have had success with this, what am I doing wrong, I tried rubbing alcohol, water, tried applying varied degrees of pressure, press hard, then a little gentle, tried dipping nails in water or rubbing alcohol and removing immediately and then placing on my nail, then wait for certain seconds, tried them all. They would work once then it wouldn't for other fingers. I can leave it like it is, that imperfection was also looking beautiful. But, I was not the one to give up now, so I found a newspaper cutting that said "You Can". I pasted that right above my nail art desk for  motivation, then put my attempts to rest as I had a toddler who required more focus than this. So once he was asleep I tried again, Painted my nails white, the bottle almost empty now from my attempts.

 Suddenly out of the blue an Idea  struck me. Yes alcohol pads, little did I know then that it was the answer I was so diligently seeking. That, they were going to bring me the beautiful images, so I cut some newspaper aligned it on my nail, took out the alcohol prep pads and pressed, when I removed the pad and paper there was my Image more clearer than ever. Hurrah !!!!!

So yes, all that my curved nail bed required was alcohol soaked in a pad, Gosh! why didn't I think of it before. I love them so much now, what a relief alas to find a friend among foes, Yes my lovable alcohol pads, I love my nails so much now that I am typing this only with my right hand, so much I wanted to preserve my hand just to show to my husband when he comes home, my faithful audience and critic.

Hope someone like me out there found something informative today from this post :-)

Products Used:
  • White polish NYN
  • SQ Rapid dry topcoat
  • Alcohol prep pads
  • Newspaper

Friday, 4 March 2016

Bundle Monster water marble plate stamping


 So I started early today around 5:30 am, and thought I have some time to myself while my toddler is still sleeping. So what color shall I paint my nails with, been using lot of SQ shades, so time for something new. I opened a bottle of steel grey metallic shade from a brand called Lea, I had mentioned earlier that I would do a detailed review of the haul, could not find time, nevertheless I find them a breeze to apply.

So I painted my nails with one coat of polish and little more to fill here and there. I loved how it looked and was wondering what color and design to stamp with. So this was a kid of shade that any other color but white would suit, now that I decided the stamping polish color, what design should I choose, I though the steel grey would look good like fish scale so would opt for a mermaid pattern. Oh I know a BP stamping plate that has the mermaid design, so as I pulled out my brand new BM lotus mat to protect my table, I thought why not try the BM water marble plate.

I have the shangri-la master plates from BM, so this is my second addition from this brand. Look at the pictures to see how beautiful the images are. I mean anyone who have tried their hands at water marbelling know the difficulty of perfecting those beautiful designs, It is just that now you can stamp them way easily any time you want with zero mess of water marbelling.

So here I am stamping the water marble designs, finally. I loved how they turned out they look even more pretty in-person. 

hope you like it too :-)


Products Used:
  • Stay Quirky Base-Coat
  • Stay Quirky Rapid dry Top-Coat 
  • Lea nail color for the base
  • Konad white for stamping
  • Stamping plate BM-XL210, sloteazzy
  • Born pretty jumbo stamper


Thursday, 3 March 2016

Polka dot nails with dotting tools


A simple and easy nail art this time. In fact it is so easy that any one can do this nail art.
You can use dotting tool or even a bobby pin would do. Take colors of you choice , I prefer using a color palette holder simply because its easy to use and clean, make different random dots with different sizes and colors using your tools, as simple as that.

You will have achieved a stunning manicure with less time and effort. I used a white base to make my colors pop.

Products used:
  • Stay Quirky Base-Coat
  • Stay Quirky Rapid Dry Top-Coat
  • Stay Quirky shade "Unicorn #536"
  • Stay Quirky Shade "Serious  Black #32"
  • Maybelline color show Shade "Orange Fix #214"
  • Maybelline Color Show shade "Blueberry Ice #403"
  • Dotting tool from eBay
  • Color palette holder from Ali express